Using the Advanced Scene Switcher Plugin with manual overrides in OBS Studio

Advanced Scene Switcher plugin: General Tab.
Open Broadcaster Software Studio comes with a built-in Automatic Scene Switcher that can switch between different scenes1 based on the title of the active window2. Sadly, at least on my Linux laptop running Pop_OS! 18.10, Chromium is not detected. As I’m going to be running Chromium to display my slides during my talk next week in Lille, this is a problem.
Enter the Advanced Scene Switcher OBS plugin, which can detect Chromium by window title and also offers a boatload of other criteria for automatically switching scenes. It does, however, require a tiny bit of configuration if you want to retain the ability to manually override the currently-displayed scene using the Scenes list in OBS and/or the multiview window.
Install Advanced Scene Switcher
To install the plugin on Linux, download and unzip it. Then, copy the advanced-scene-switcher.so file from the SceneSwitcher/Linux directory to your OBS Studio plugins directory. For me, that was:
cp SceneSwitcher/Linux/advanced-scene-switcher.so /usr/lib/obs-plugins/Instructions for other platforms are available on the plugin’s web site.
Disable Automatic Scene Switcher
Make sure you disable the built-in Automatic Scene Switcher (Tools → Automatic Scene Switcher → Stop) and restart OBS Studio.
Set up your window-title-to-scene mappings
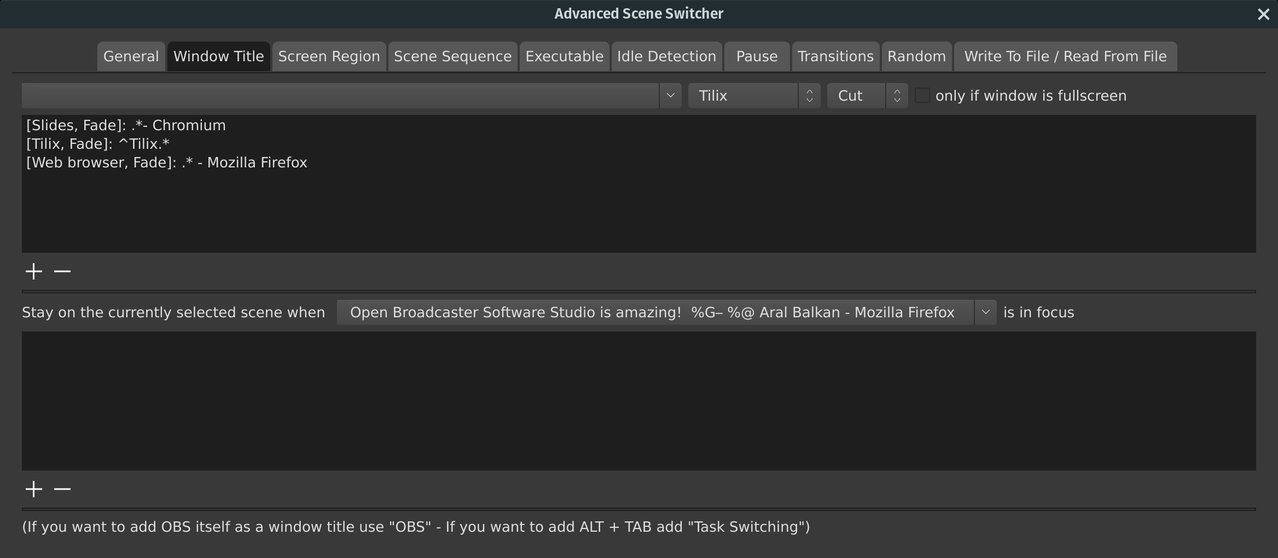
Applications are detected using regular expressions and the Window Title.
Use the Window Title tab to add regular expressions to match and map them to the scenes you want them to trigger.
For example, when Scene Switcher detects that a window with a title that starts with “Tilix3” gains focus, it switches to the scene called Tilix.
Enable manual override
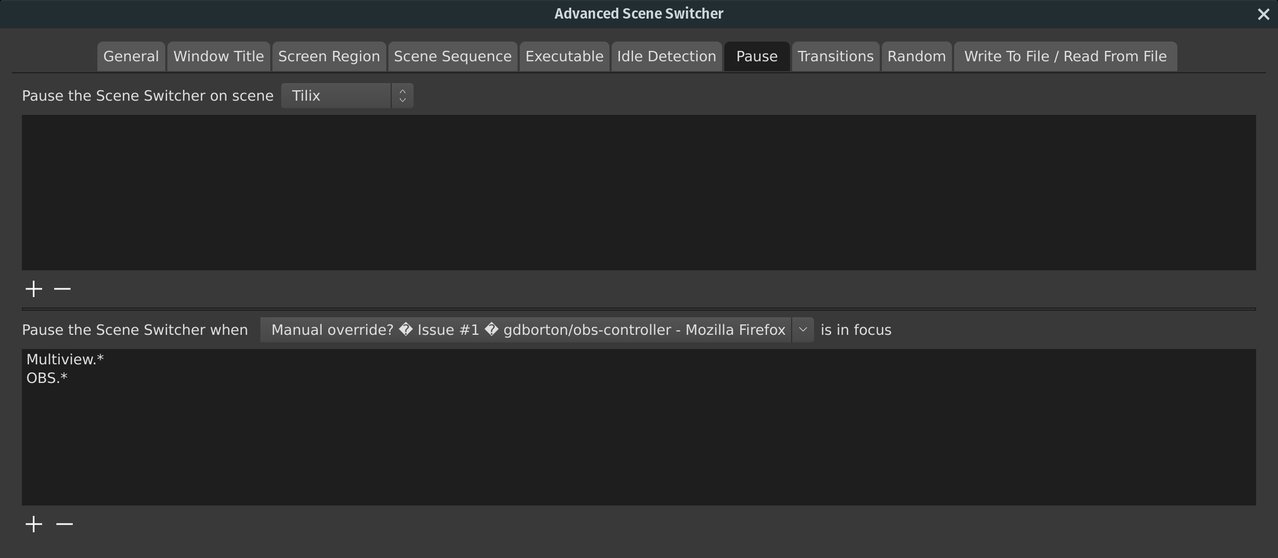
To enable manual overrides, you must tell the Scene Switcher to pause when OBS and the Multiview window are in focus.
This bit is important and it tripped me up initially. If you want to retain your ability to manually override the shown scene using the Scenes list or the multiview window in OBS, you must pause Automatic Scene Switcher for these windows. To do so, switch to the Pause tab in the plugin’s dialogue window and add the following two entries to the Pause the Scene Switcher when … is in focus list:
Multiview.*
OBS.*
That’s it. You should now have the Advanced Scene Switcher plugin properly set up to detect and switch to the corresponding scene for you when you switch applications and you should still be able to manually switch to you scene of choice using the Scenes list and the multiview window in OBS Studio.
Enjoy!
-
Scenes are combinations of sources (inputs). For example, if I want a screen that has a full-screen recording of my web browser with a picture-in-picture overlay of my camera, I would make a scene with two sources: one, a Window Capture source set to capture video from my web browser’s window and the other a Video Capture Device set to use my webcam. Then, I can scale and position the webcam video over the browser. ↩︎
-
More specifically, you can match a window title using regular expressions. ↩︎
-
In other words, a window with a title that matches the regular expression
^Tilix.*, which reads “starts with (^) the literal string Tilix (Tilix) and followed by zero or more characters of any type (.*). ↩︎